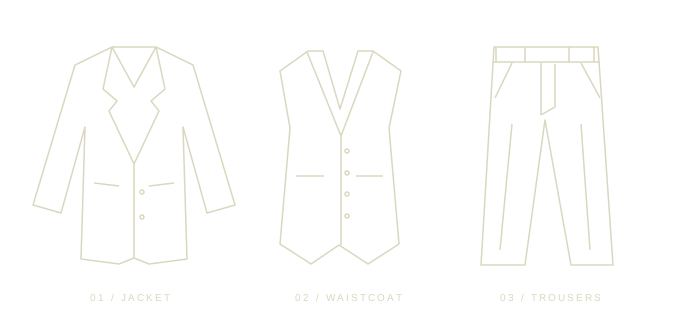
A size label is a reference, not a measurement. Different suppliers and cuts can fit differently—even when the number on the label is the same.
Need an exact size recommendation?
The measurement charts for these ranges are not yet verified. Use this guide to prepare your measurements and have the exact style checked in store before choosing sizes. We won't turn an unverified number into a fit promise.
Changing centimetres to inches converts a measurement. It does not convert a UK, EU or supplier-specific clothing size.
01 / MEASURE WELL
A little care. A better starting point.
A flexible tape, a mirror, a helper and clothing that sits close to your body.
01
Keep it natural
Stand comfortably, with your arms relaxed. Breathe normally. Don't pull in your stomach or lift your chest to change the reading.
02
Keep it consistent
Take body readings over a light shirt or thin layer, without a jacket. Keep the tape level and in contact without compressing you. Record the layer used.
03
Measure twice
Check the tape's unit before you start. Repeat each reading in the same position. If it changes, reset the tape and ask a helper to check.
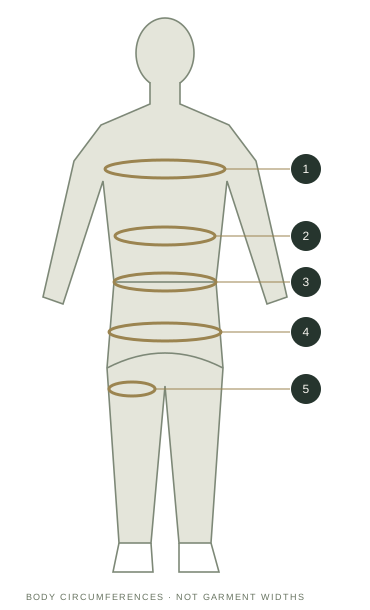
Positions are illustrative. Follow the written landmarks and the chart for the actual garment.
01 Chest circumference
Pass the tape beneath the armpits, around the fullest chest and across the shoulder blades. Lower your arms before the reading is taken. A helper should check that the tape hasn't climbed up at the back.
Record: the complete circumference, not the distance across your chest. Use it for jacket and waistcoat discussions; it does not determine either size by itself.
Avoid: measuring around a jacket, flexing, holding your breath or adding extra centimetres for comfort.
02 Fullest midsection
Measure around the fullest part of your abdomen, often near the navel, with the tape horizontal and your stomach relaxed. Record the position if it is above or below the navel.
This helps check jacket and waistcoat room through the body. It is different from the circumference where you wear your trousers—and may differ from a chart's “natural waist” landmark.
Avoid: substituting your jeans label or using the narrowest point when the chart asks for the fullest midsection.
03 Trouser waistband position
Choose where the suit trousers should sit, then measure around your body at that level. Keep the tape level and note whether this is high, mid or low on your waist.
A different rise can put the waistband at a different circumference. Match the intended style, rather than measuring where low-rise jeans happen to sit. Check comfort sitting as well as standing.
Avoid: treating the fullest abdomen reading, the natural waist and trouser waist as interchangeable.
04 Seat / hip circumference
With your feet close together, pass the tape around the fullest part of your seat and hips. Check from the side that it crosses the most projecting part of the buttocks and stays level.
Record the complete circumference. Trousers need enough room here even when the waistband feels right.
Avoid: measuring only across the front or pulling the tape into the body.
05 Upper thigh circumference
Measure around the fullest upper thigh with your weight balanced and muscles relaxed. Keep the tape perpendicular to the leg. If the two legs differ, record both in your notes.
Use this as supporting information in a fitting. The supplier's garment thigh measurement may use a particular distance below the crotch, so the landmarks must be matched.
Avoid: choosing a narrow trouser cut solely because the waist size matches.
Body measurement means the person. Garment measurement means the finished clothing. The difference includes ease—the space for movement and layers. Don't add a universal allowance to your body readings or expect the two numbers to match. Use the exact chart's method.
ANOTHER USEFUL REFERENCE
Start with something that already fits.
Garment measurements stay separate from your body measurements.
Your jacket
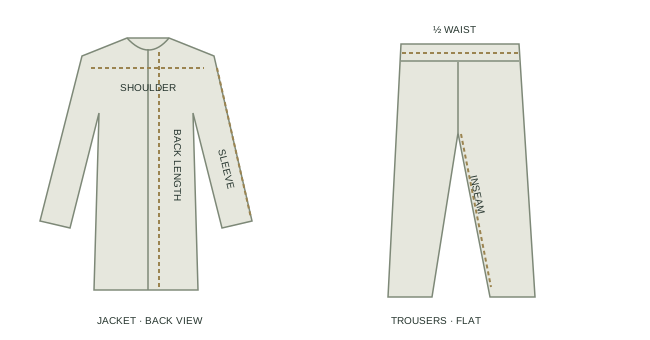
Lay a well-fitting jacket flat, without stretching it. For shoulder width, measure across the back between the two shoulder/sleeve seam intersections. For sleeve length, follow the sleeve from the shoulder seam to the cuff. For back length, start at the centre collar seam, exclude the collar and finish at the hem.
Button and flatten it for a chest-width comparison. Measure armhole to armhole. This flat width is not a body circumference. Compare only with a garment chart using the same method.
Your trousers
Button and zip a well-fitting pair. Flatten the waistband, align front and back, then measure edge to edge: this is half-waist width. Twice that width gives the approximate garment circumference, not your body reading or label size.
For inseam, follow the inside seam from the crotch seam intersection to the hem. Do not use the outside leg length. For rise, follow the seam from the crotch intersection to the top of the front waistband; keep front and back rise distinct.
Your waistcoat
Button a waistcoat that fits, then lay it flat without stretching. Record its chest width from underarm to underarm as a flat width. For a back-length reference, measure down the centre back from the neckline seam to the back hem. Keep the back adjuster relaxed and note its position.
Check the front hem on your body with the intended trousers as well: the front can be longer than the back. Do not use back length as a substitute for front coverage. If a supplier chart uses a different starting point, remeasure to that method before comparing.
Illustrations drawn for this guide. Methods informed by Proper Cloth's jacket and trouser measurement guides.
02 / THREE SEPARATE DECISIONS
One look. Your own combination.
A larger jacket never automatically means larger trousers or a larger waistcoat.
01
The jacket
Start with shoulders and chest.
The shoulder line should sit cleanly, without obvious overhang or indentation at the sleeve.
With the intended shirt and waistcoat underneath, fasten the jacket's usual closing button. Look for a smooth front rather than strong X-shaped pulling or lifted lapels.
Check the collar lies close to the shirt collar. A large gap, persistent back folds or restricted reaching needs a fitting review.
Assess sleeve and body length together. Short, regular and long are garment proportions, not a rule based on height alone.
Shoulder shape, torso room, rise and thigh room vary by style. If one part fits and another pulls, a different cut may work better than simply changing the size. Have alterations assessed on the actual garment; they cannot reliably rescue every fit.
And the finishing touches? Shirts, belts & accessories +
Shirts & neckwear
Measure around the base of your neck where a collar sits, keeping the tape level and comfortable. Compare with that shirt's collar chart and allowance instructions; also check chest, midsection and sleeve method. A centre-back-to-cuff sleeve figure differs from shoulder-to-cuff. Check a bow tie's adjustable neck range and a tie's length, not just its colour.
Belts, braces & cuffs
A useful belt reference runs from the strap's buckle attachment to the hole you use on a belt that fits. The tip-to-tip length is different; check the product's method. Don't use a belt to compensate for oversized trousers. Check braces' adjustment range and fastenings, and whether cufflinks need a double-cuff shirt.
A fit conversation starts here. This records your references; it doesn't assign sizes.
04 / WHEN YOU TRY IT ON
Don't just stand. Move in it.
Try all three pieces together with the intended shirt and shoes. Check front, side and back views in a mirror.
If something feels wrong, stop and ask about the fit before arranging alterations. Check the shop's returns and alteration terms before making changes to the garment.
These are observation prompts, not a guarantee of fit.
A FEW THINGS WORTH KNOWING
Fit, without the guesswork.
Can my jacket, waistcoat and trousers all be different sizes?
Yes. The Suit Shop allows separate sizes for each piece. Check each component's measurements and stock independently. Do not calculate trousers from a jacket size or assume the waistcoat must match the jacket label.
Can I use a UK/EU conversion or a generic “Chinese size” chart?
Use only a conversion supplied for the exact range. A country of manufacture doesn't tell you how a brand labels its suits. Numbers, S/M/L labels and height/chest codes can describe different systems. Record the whole label, including length letters or suffixes, and ask the shop to identify it.
I'm between sizes. Should I always go up?
No automatic rule works for every piece. Recheck the measurement method, then compare the exact cut's body range and garment dimensions. A larger size can fix one area and spoil another. Without a verified chart, an in-store review is a better next step than guessing or ordering several sizes.
Can an alteration fix anything that doesn't fit?
No. The available fabric, construction and proportions limit what can be changed. Have shoulder, chest, rise and length concerns assessed before relying on alterations. This site does not promise a particular alteration allowance, price or turnaround.
I already know my size. Do I need to measure again?
A previously tried-on size is a useful starting point for the same range and cut, especially if your measurements haven't changed. Keep the brand, style, length and component labels together. A new range or supplier still needs checking.
Will this guide guarantee that I won't need a return?
No. It helps you identify the information and fit checks that matter. Measuring the actual stock, checking individual cuts and learning from real customer fittings are essential too. If you remain uncertain, use the shop's in-person experience before ordering.
Use our suit size guide to measure in centimetres and understand jacket, waistcoat and trouser sizes. Check each piece and confirm your range with a branch.